bits and pieces from the life of a lazy blogger...who sometimes hoped to be abducted by alien before the go-live of a difficult project and safely return to Earth in time for the closing celebration
Labels
- Bits and Pieces
- It's about food
- Kid #1
- Kid #2
- Occasions
- Retail Therapy
- Technical stuff
- Travel Diary
Showing posts with label It's about food. Show all posts
Thursday, November 3, 2011
Eating Out With My Toddler... IKEA
Sunday, October 30, 2011
Eating Out With My Toddler... Shin-Sapporo Ramen
Stay tuned to "Eating out with kids"... I will share more as and when I remembered to take pics!
Tuesday, October 25, 2011
Eating Out With My Toddler... Suki-Ya Hotpot Buffet
![]() |
| Suki-Ya Hotpot Buffet @ Tampines Mall, B1 Free for kids below 4 years old We had the double-sided hotpot and ordered a non-spicy soup base for the kids, they loved the udon, japanese fish cake and of course the softy ice-cream There is "free flow" of iPad at the kids corner! We were given a table near to the kids corner so the boys can play while we eat our dinner. |
Tuesday, October 18, 2011
Fun With Food - Edamame
Edamame is a common food in our part of the world, readily available in the super market and easily prepared. It's a healthy snack with a nutritional punch! Fun too for the little fingers to practice their fine motor skills.
Bay is 26.5 months old and with some practice, he can "extract" the beans from the pod and separate the "used" pods. Choke hazard though, so do supervised your child while eating.
Sunday, October 2, 2011
Eating Out With My Toddler... NYDC
I eat out with my boy most of the time after he crossed the "ok to eat outside food" official age of 12 months. Most of the restuarants in Singapore provide some form of kids cutleries and high chair, so eating out is not much of an issue. Many places provide very reasonable kid's menu.
FAQ 1: Who said 12 months is the official "ok to eat outside food" age?
Ans: Hmm... I dont know and I didnt ask!
FAQ 2: Am I concern about the excessive intake of salt, oil and MSG?
Ans: Yes, of course! I will try to "wash" the food in warm water if I find them too salty or oily and I usually leave out the soup or gravy.
FAQ 3: What sort of food do you order for your boy?
Ans: Usually I will check out the kids menu first and see if they have any interesting food. Most of the time he will share my food. I will have to order something non-spicy for him though. It is important to make a conscious effort to maintain a well balance diet while eating out. Meaning that there shall be protein, fiber and carbohydrate for each meal. I find that it is easy to forget about the greens when eating outside.
Here's the food that I ordered for my boy while eating out...
Stay tuned to "Eating out with kids"... I will share more as and when I remembered to take pics!
FAQ 1: Who said 12 months is the official "ok to eat outside food" age?
Ans: Hmm... I dont know and I didnt ask!
FAQ 2: Am I concern about the excessive intake of salt, oil and MSG?
Ans: Yes, of course! I will try to "wash" the food in warm water if I find them too salty or oily and I usually leave out the soup or gravy.
FAQ 3: What sort of food do you order for your boy?
Ans: Usually I will check out the kids menu first and see if they have any interesting food. Most of the time he will share my food. I will have to order something non-spicy for him though. It is important to make a conscious effort to maintain a well balance diet while eating out. Meaning that there shall be protein, fiber and carbohydrate for each meal. I find that it is easy to forget about the greens when eating outside.
![]() |
| 02 October 2011: NYDC @ Tampines One. We ordered the chicken little spaggy and they are considered enough to cut the spag into short length. No drinks included in the meal |
Stay tuned to "Eating out with kids"... I will share more as and when I remembered to take pics!
Sunday, May 22, 2011
Captain Mama's Rice Dumplings
又到了粽子飘香的季节了!
The process of making rice dumplings are painfully tedious. From washing the leaves, to cutting the meat, braising the mushrooms, chopping the dried prawns, dicing the sugared winter melon, frying the shallots, cleaning the dried chestnuts, .... to bundling them up in a pyamid and finally boiling them for hours. It is a few days of preparation and hard work.
Every year, mum will go through the trouble to prepare some home-made mama brand rice dumplings for us... as we refuse to eat any rice dumplings bought outside. There was a period of almost 5 years that I didnt eat any as I was staying in Beijing. The rice dumplings sold in northern china are totally different and not to my liking. Without fail for this year too, mum had prepare the rice dumplings, except that it is even more valuable because she literally risk her new eye to make them.
Mum went for cataract surgery about a month ago, though the doc gave the go ahead to cook, she still feels uncomfortable from the steam, heat, irritation from the shallot gas and pressure from bending her head for too long. Still, she insisted on doing EVERYTHING on her own, refusing any help from us. I suspect that she thinks I am incapable of cutting the meat or shallot to the exact size needed.
She will cover her new eye with a hankie and put on sunglasses for a bit more protection.
This is the face of a dedicated mum, grandma, aunty, sister and wife. She will remember exactly who likes it with more fatty meat or lean meat, who likes it with more chestnuts, who likes to top it with fried shallots and who likes nonya ones instead of the normal "bak" ones...
If you managed to get hold of Captain Mama's rice dumplings, make sure you finish every single molecule of it... for it is priceless. No amount of money can buy you such dedication.
The process of making rice dumplings are painfully tedious. From washing the leaves, to cutting the meat, braising the mushrooms, chopping the dried prawns, dicing the sugared winter melon, frying the shallots, cleaning the dried chestnuts, .... to bundling them up in a pyamid and finally boiling them for hours. It is a few days of preparation and hard work.
Every year, mum will go through the trouble to prepare some home-made mama brand rice dumplings for us... as we refuse to eat any rice dumplings bought outside. There was a period of almost 5 years that I didnt eat any as I was staying in Beijing. The rice dumplings sold in northern china are totally different and not to my liking. Without fail for this year too, mum had prepare the rice dumplings, except that it is even more valuable because she literally risk her new eye to make them.
Mum went for cataract surgery about a month ago, though the doc gave the go ahead to cook, she still feels uncomfortable from the steam, heat, irritation from the shallot gas and pressure from bending her head for too long. Still, she insisted on doing EVERYTHING on her own, refusing any help from us. I suspect that she thinks I am incapable of cutting the meat or shallot to the exact size needed.
![]() |
| Captain Mama in action! |
She will cover her new eye with a hankie and put on sunglasses for a bit more protection.
This is the face of a dedicated mum, grandma, aunty, sister and wife. She will remember exactly who likes it with more fatty meat or lean meat, who likes it with more chestnuts, who likes to top it with fried shallots and who likes nonya ones instead of the normal "bak" ones...
If you managed to get hold of Captain Mama's rice dumplings, make sure you finish every single molecule of it... for it is priceless. No amount of money can buy you such dedication.
Monday, February 21, 2011
This is the taste I'm talking about...
It's true, I classify places and memories by taste.
A bit more than 25 years ago, when I was in primary 2, I went to Hong Kong with my mum. What did I remember about HongKong in the 80s? Not much actually, I vaguely remember that it was crowded, streets were like those in Chinatown and we stayed in a really small hotel. One thing however, that I will never forget is the taste of the take-away dinner bought from a small shop next to the hotel. I never had anything like that in Singapore before, some sort of a tangy tomato sauce on rice. It is not the same as the "Sweet & Sour sauce pork", not quite like tomato based pasta sause neither. This is the taste I remember of Hong Kong in the 80s.
I got to know that the tomato sauce on rice dish is known as "Bake rice" and I loved it so much that I must have it every few weeks... but none of the bake rice I had ever reminded me of Hong Kong in the 80s. During subsequent trips to Hong Kong, I just can't find that taste anymore... maybe taste do move on too.
During the latest trip there, we decided to have a quick lunch at the airport as Kiiron slept through the whole flight and did not have anything to eat. We walked into "美心express" at the arrival hall and ordered 1 bake rice and 1 wanton noodle.
OMG!!! This bake rice is exactly the taste I'm talking about... the taste of Hong Kong in the 80s!
BTW, the wanton noodles is nice too, but it's just wanton noodles, no special memory.
Yes... taste lasted much longer in my memory, much longer than any other feelings...
A bit more than 25 years ago, when I was in primary 2, I went to Hong Kong with my mum. What did I remember about HongKong in the 80s? Not much actually, I vaguely remember that it was crowded, streets were like those in Chinatown and we stayed in a really small hotel. One thing however, that I will never forget is the taste of the take-away dinner bought from a small shop next to the hotel. I never had anything like that in Singapore before, some sort of a tangy tomato sauce on rice. It is not the same as the "Sweet & Sour sauce pork", not quite like tomato based pasta sause neither. This is the taste I remember of Hong Kong in the 80s.
I got to know that the tomato sauce on rice dish is known as "Bake rice" and I loved it so much that I must have it every few weeks... but none of the bake rice I had ever reminded me of Hong Kong in the 80s. During subsequent trips to Hong Kong, I just can't find that taste anymore... maybe taste do move on too.
During the latest trip there, we decided to have a quick lunch at the airport as Kiiron slept through the whole flight and did not have anything to eat. We walked into "美心express" at the arrival hall and ordered 1 bake rice and 1 wanton noodle.
OMG!!! This bake rice is exactly the taste I'm talking about... the taste of Hong Kong in the 80s!
BTW, the wanton noodles is nice too, but it's just wanton noodles, no special memory.
Yes... taste lasted much longer in my memory, much longer than any other feelings...
Friday, December 31, 2010
Oreo Cheesecake
Following my success in making the Strawberry Jelly Hearts, I decided to advance into making Oreo Cheesecake for our New Year.
I got my inspiration from the recipe on the carton box of Philadelphia cream cheese
Serving size: 18cm X 12cm, can cut into at least 8 pieces. (I cut it into 15 small pieces)
Making the Base
I'm using the 18cm X 12cm (1L) LocknLock plastic container again since it served me well for the Strawberry Jelly Hearts.
Ingredients
Method
Making the Cheese layer
I wanted to make the cheese layer thicker as there's no Jelly layer
Ingredients
Method
The Presentation
I can't think of what to decorate this cake with, I've seen others crushing Oreo (again!) and sprinkle on the top but I thought that looked too boring. So this smart aleck decided to put mini smarties on it... isnt it pretty to look at?
Bad choice! The smarties will "bleed" its colour all over the white cheese layer and the look is totally ruined. Any suggestion on what I can use to decorate?
The Review
Not as popular as the Strawberry Jelly Hearts. Actually I didnt like it myself also, I didnt like Oreo to begin with... so this review is not fair for the poor Oreo cheesecake. There is no Jelly layer nor fruits, so it is a bit 腻 after the 1st piece. We didnt even finish these... some was "donated" to the bin.
I got my inspiration from the recipe on the carton box of Philadelphia cream cheese
Serving size: 18cm X 12cm, can cut into at least 8 pieces. (I cut it into 15 small pieces)
Making the Base
I'm using the 18cm X 12cm (1L) LocknLock plastic container again since it served me well for the Strawberry Jelly Hearts.
Ingredients
- 100g of Oreo biscuit (split the Oreo and remove the cream filling before weighing, keep the filling for later use)
- 40g melted butter
Method
- Place the biscuit into a plastic bag and crush into crumbs.
- Add melted butter into the plastic bag of crumbs and mix well. The crumbs should fuse together with the butter into a moist loose lump.
- Line the base of the container with plastic bag or aluminum foil. Make sure that the sides of the bag or foil is overhanging out of the container. This will make the process of removing the "finished goods" from the container easier.
- Pour the moist crumbs into the container and press firmly with the help of a spoon. Make sure the thickness is even.
- Close the cover and chill for at least 30 minutes
Making the Cheese layer
I wanted to make the cheese layer thicker as there's no Jelly layer
Ingredients
- 250g Philadelphia cream cheese, soften at room temperature
- 50g sugar (I replaced part of the sugar with the Oreo cream filling, i.e. if there's 30g of the filling, then just add 20g of sugar... Recycling rocks!)
- 2 tablespoon gelatin powder dissolved in 80ml of hot water
Method
- Beat the cream cheese and sugar into a smooth and creamy texture. I don't have an electric mixer, so I use a fork and bowl. Takes about 5-10 minutes to get the creamy texture.
- Pour in the gelatin solution and mix well.
- Pour the cheese mixture onto the base and and put aside for 10-15 minutes. The cheese layer should not be fully set but not as liquid as before
- Space the mini smarties and press lightly onto the cheese layer
- Chill for at least 3 to 4 hours
- Cut to serve
The Presentation
I can't think of what to decorate this cake with, I've seen others crushing Oreo (again!) and sprinkle on the top but I thought that looked too boring. So this smart aleck decided to put mini smarties on it... isnt it pretty to look at?
Bad choice! The smarties will "bleed" its colour all over the white cheese layer and the look is totally ruined. Any suggestion on what I can use to decorate?
The Review
Not as popular as the Strawberry Jelly Hearts. Actually I didnt like it myself also, I didnt like Oreo to begin with... so this review is not fair for the poor Oreo cheesecake. There is no Jelly layer nor fruits, so it is a bit 腻 after the 1st piece. We didnt even finish these... some was "donated" to the bin.
Monday, December 20, 2010
My attempt of the Strawberry Jelly Hearts
I'm not a fan of cheesecake... I love cheese but cheese and cake are like the strangest combination I've ever tasted! Perhaps I dont have a sweet tooth and I dont like cake so that's why...
However, when I tried the strawberry hearts during the Aug09 bubs gathering, my opinion of cheesecake changed abit. It's not those mousse type of cheesecake (I hate mousse stuff too!) and the biscuit base is not really a cake. We ordered the strawberry hearts from Eds Jelly Hearts
For the longest of time, I had wanted to make the Jelly Hearts. The non-bake method looks simple enough for anyone, even a novice like me. I got the receipe from happyhomebaking and made some changes to suit the container that I had. She has some very important advices on WHEN to add in the strawberries, so do read carefully before your attempt.
Serving size: 18cm X 12cm, can cut into at least 8 pieces
Making the Base
This is my first attempt in making any cake at home and I don't have any baking tins or anything close to that. I just make do with whatever I have at home and I found this 18cm X 12cm (1L) LocknLock plastic container. The most difficult part about making this is to adjust the recipe to suit the container.
The method requires the ingredients to be placed in the refrigerator for a long period of time and I'm super particular about placing food uncovered inside the fridge, so LocknLock with the airtight cover works well for me!
Ingredients
Method
Ingredients
Method
Making the Jelly layer
I try to make the Jelly layer to be about the same thickness as the cheese layer and not too sweet. So I cut down the Jelly-O crytals and replace with gelatin powder.
Ingredients
Method

The Presentation
The pretty red see-through jelly layer and the strawberries details are already so lovely that there is really no need to decorate this anymore. What's left is to trim away the sides and cut it into sizes. The trick to get nice neat edges to use a long knife and cut each side in 1 move.
However, when I tried the strawberry hearts during the Aug09 bubs gathering, my opinion of cheesecake changed abit. It's not those mousse type of cheesecake (I hate mousse stuff too!) and the biscuit base is not really a cake. We ordered the strawberry hearts from Eds Jelly Hearts
For the longest of time, I had wanted to make the Jelly Hearts. The non-bake method looks simple enough for anyone, even a novice like me. I got the receipe from happyhomebaking and made some changes to suit the container that I had. She has some very important advices on WHEN to add in the strawberries, so do read carefully before your attempt.
Serving size: 18cm X 12cm, can cut into at least 8 pieces
Making the Base
This is my first attempt in making any cake at home and I don't have any baking tins or anything close to that. I just make do with whatever I have at home and I found this 18cm X 12cm (1L) LocknLock plastic container. The most difficult part about making this is to adjust the recipe to suit the container.
The method requires the ingredients to be placed in the refrigerator for a long period of time and I'm super particular about placing food uncovered inside the fridge, so LocknLock with the airtight cover works well for me!
Ingredients
- 7 pieces of digestive biscuits
- 40g melted butter
Method
- Place the biscuit into a plastic bag and hammer into crumbs. Kids can help too. I borrowed Kiiron's little toy hammer and it did the job perfectly!
- Add melted butter into the plastic bag of crumbs and mix well by pressing from outside the plastic bag. This is good as my hands will not get dirty. The crumbs should fuse together with the butter into a moist loose lump.
- Line the base of the container with plastic bag or aluminum foil. Make sure that the sides of the bag or foil is overhanging out of the container. This will make the process of removing the strawberry hearts from the container easier.
- Pour the moist crumbs into the container and press firmly with the help of the plastic hammer or a spoon. Make sure the thickness is even.
- Close the cover and chill for at least 30 minutes.
Making the cheese layer
Ingredients
- 125g Philadelphia cream cheese, soften at room temperature
- 25g sugar
- 1 tablespoon gelatin powder dissolved in 40ml of hot water
Method
- Beat the cream cheese and sugar into a smooth and creamy texture. I don't have an electric mixer, so I use a fork and bowl. Takes about 5-10 minutes to get the creamy texture.
- Pour in the gelatin solution and mix well.
- Pour the cheese mixture onto the base and put aside for 10-15 minutes. The cheese layer should not be fully set but not as liquid as before.
- Half the strawberries. You can cut into heart shapes if you have the cutter. I don't, so I just use the half as it is. I dont like wastage and actually I find using the whole half taste better as there is more fruit in each bite.
- Space the strawberries apart and press lightly into the cheese mixture. Chill for at least 3 to 4 hours.
Making the Jelly layer
I try to make the Jelly layer to be about the same thickness as the cheese layer and not too sweet. So I cut down the Jelly-O crytals and replace with gelatin powder.
Ingredients
- 3 tablespoon of Jelly-O crystal (Raspberry flavour)
- 1 tablespoon of gelatin powder
- 100ml of hot water
- 50ml of cold water
Method
- Dissolve the Jelly-O crystal and gelatin powder in the hot water, then add in the cold water.
- Pour the liquid Jelly on the cheese mixture SLOWLY. Chill until jelly is set. Make sure that you place the container in a flat level area in the fridge.
- Make sure the jelly is set before removing from the container by pulling the sides of the plastic or foil

The Presentation
The pretty red see-through jelly layer and the strawberries details are already so lovely that there is really no need to decorate this anymore. What's left is to trim away the sides and cut it into sizes. The trick to get nice neat edges to use a long knife and cut each side in 1 move.
The Reviews
My family are not really into cakes or pasteries so I won't say that these are snapped up immediately, but they did finished eating all including the ugly sides. Someone commented that I can make some for our future parties, coming for a family who don't give out praises readily... I would say YES!!! they love it. Ha! Ha!
.
Thursday, April 15, 2010
Lazy mummy's cooking method
I'm a lazy mummy who hardly cook for my boy. Fortunately my mum is a good cook and Bay still gets his fairshare of home-cooked meals.
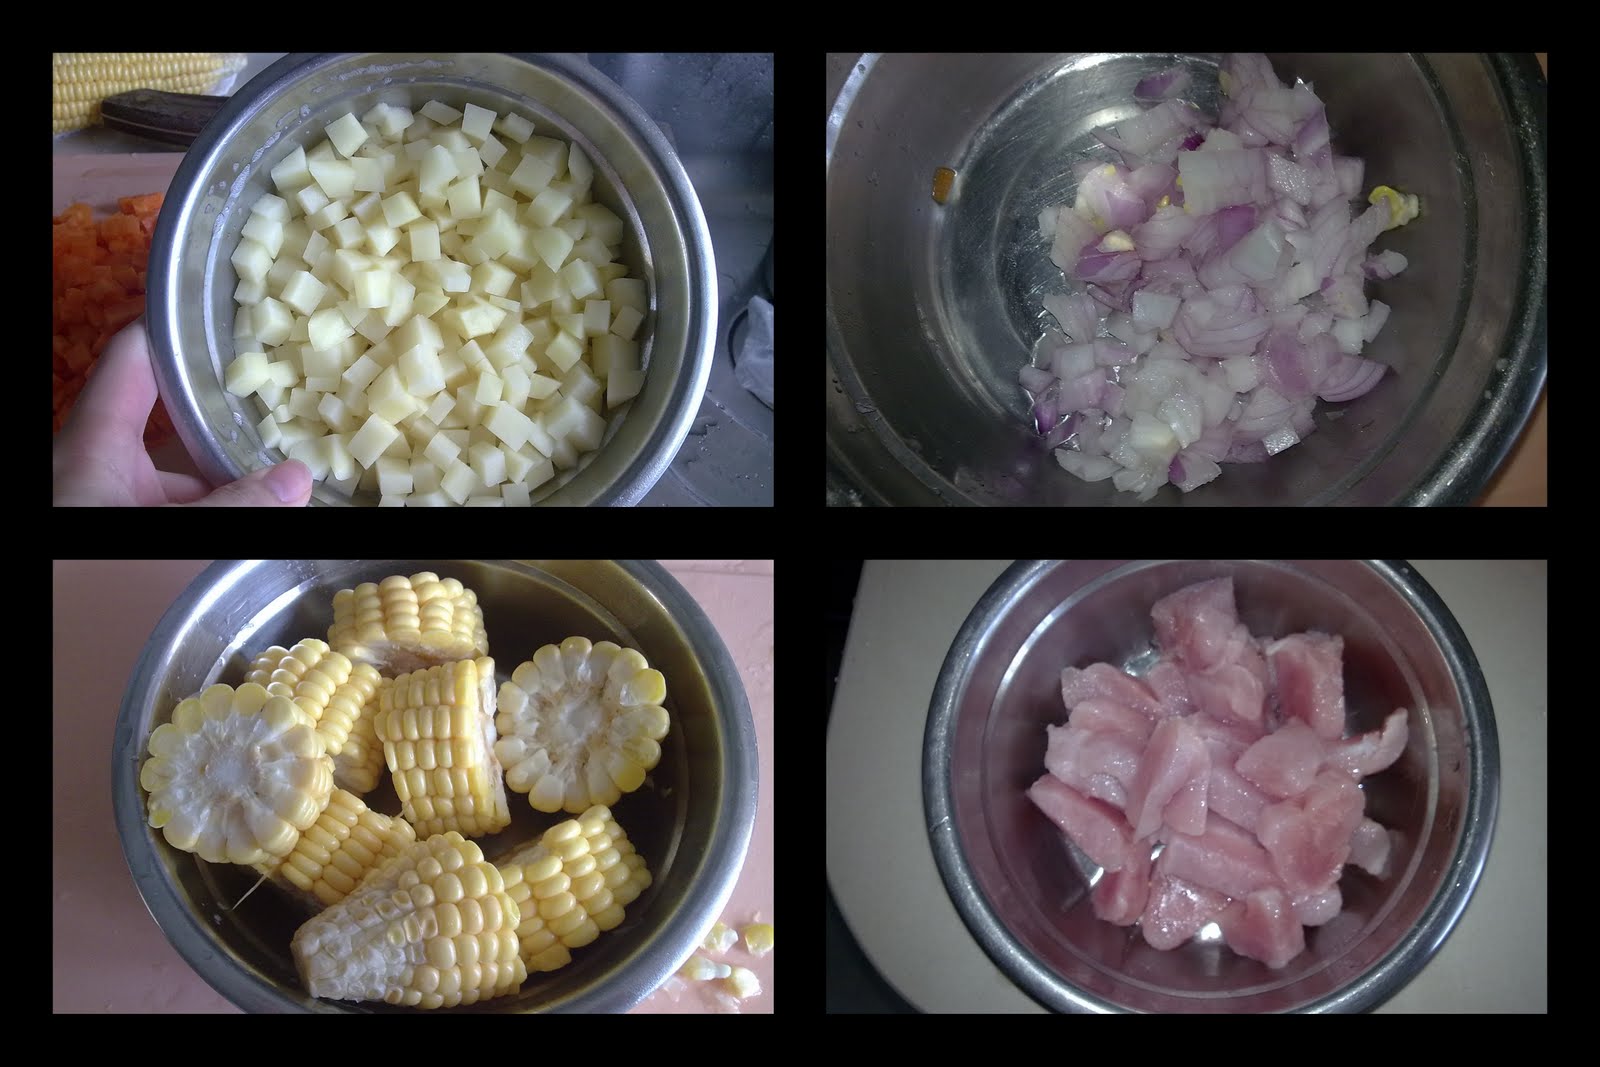
My parents were not in town for 1 week and I had to take over cooking Bay's meals. I'm a FTWM and had very little time to cook (excuse! excuse! excuse!), so I pre-cooked the soup stock and freeze it.
Note: Onion has a strong taste, you will have to cook it until it is totally soft to eliminate the "spicy" taste. Dont add if your little one is not used to the taste. You can also add apple into the soup to make it sweeter.
Method
Ways to use the soup stock
I try to think of various ways to use the soup stock everyday so that Bay can have different type of food. It takes about 15 minutes to prepare his meals
Tips: My mum always cooked the mee sua in a separate pot of water instead of adding it directly into the soup base to cook. This is because the mee sua on its own contain salt and by adding it into the soup base will make it too salty. I'm cooking for my 8.5 mths baby who is not yet ready to take any salt in his diet, cooking the mee sua separately will "wash out" some salt.
Method:
Top picture: porridge with just only the soup stock.
Middle picture: porridge with chopped broccoli and soup stock
Bottom picture: porridge with blended steam corn, "午" fish and soup stock.
See also Sweet potato porride in Tiger Food Jar
My parents were not in town for 1 week and I had to take over cooking Bay's meals. I'm a FTWM and had very little time to cook (excuse! excuse! excuse!), so I pre-cooked the soup stock and freeze it.
Making the Soup Stock
- 1 potato
- 1 large onion
- 1 corn
- 1 carrot
- Lean pork, about 200g
- 1.5L water
Note: Onion has a strong taste, you will have to cook it until it is totally soft to eliminate the "spicy" taste. Dont add if your little one is not used to the taste. You can also add apple into the soup to make it sweeter.
Method
There is really no method, just peel and dice everything up then dump into a big pot. Heat up until boiling and simmer till everything is soft. No need to put seasoning when cooking for babies. I added onion as it is suppose to keep the flu bugs away.
Ways to use the soup stock
I try to think of various ways to use the soup stock everyday so that Bay can have different type of food. It takes about 15 minutes to prepare his meals
Method:
- Wash a small section of mee sua and cut into length of about 2cm.
- Add mee sua to a small pot of about 200ml boiling water, continue to boil until mee sua is cooked
- Strain the water away
- Heat up a portion (180ml) of defrosted soup stock and add in the cooked mee sua
- Boil a while more and it's done!
Tips: My mum always cooked the mee sua in a separate pot of water instead of adding it directly into the soup base to cook. This is because the mee sua on its own contain salt and by adding it into the soup base will make it too salty. I'm cooking for my 8.5 mths baby who is not yet ready to take any salt in his diet, cooking the mee sua separately will "wash out" some salt.
Method:
- Follow the instructions for the brown rice cereal that you are using to get the correct consistency. I bought the Eu Yan Sang Si Shen Brown Rice powder for my boy.
- I replaced 1 portion of the soup stock instead of water and add some chopped up spinach and "午" fish.
Method:
- I use the Tiger Food Jar to cook the porridge. Follow the instructions in trial for tiger food jar and replace the water with soup stock.
- I added some extra ingredients to create versions of porridge for different days.
Top picture: porridge with just only the soup stock.
Middle picture: porridge with chopped broccoli and soup stock
Bottom picture: porridge with blended steam corn, "午" fish and soup stock.
See also Sweet potato porride in Tiger Food Jar
Thursday, April 1, 2010
Sweet potato porridge in Tiger Food Jar
I managed to get quite decent sweet potato porridge with the Tiger Food Jar.
Just follow the instructions in trial for tiger food jar and add 1 serving of sweet potato cut into thin slices. I did boil the contents for 5 minutes before pouring into the food jar.

Right side is how it was like straight from the food jar. (after pouring out the "am")
Left side is how it is after I meshed it with the back of a spoon for my 8 months old baby
Bay is not very enthusiastic about food and takes 45-60 mins to finish 1 small bowl. He loves to drink the "am" though.
See also Lazy mummy's cooking method
Just follow the instructions in trial for tiger food jar and add 1 serving of sweet potato cut into thin slices. I did boil the contents for 5 minutes before pouring into the food jar.

Right side is how it was like straight from the food jar. (after pouring out the "am")
Left side is how it is after I meshed it with the back of a spoon for my 8 months old baby
Bay is not very enthusiastic about food and takes 45-60 mins to finish 1 small bowl. He loves to drink the "am" though.
See also Lazy mummy's cooking method
Saturday, March 13, 2010
Trial for the Tiger Food Jar
I did a trial with the Tiger Food Jar and it is really fuss free!
The porridge turn out to be very soft, something like those watery teochew porridge. I need to pour the "am" away and mesh up the contents a little with a spoon to suit my 7.5 months baby. I feed him the "am" separately like a soup and he loves it too!
The difficult part about cooking with this food jar is to estimate how much rice grains and water to add.
Serving size: 1 bowl of porridge
Ingredients
Method
If you are looking for something that whip up those sticky cantonese porridge, this gadget will not do the job.
See also Sweet potato porride in Tiger Food Jar, Lazy mummy's cooking method
The porridge turn out to be very soft, something like those watery teochew porridge. I need to pour the "am" away and mesh up the contents a little with a spoon to suit my 7.5 months baby. I feed him the "am" separately like a soup and he loves it too!
The difficult part about cooking with this food jar is to estimate how much rice grains and water to add.
Serving size: 1 bowl of porridge
Ingredients
- 1 chinese soupspoon of rice grains, washed
- 300ml boiling hot water
Method
- Washed the food jar and pre-heat it by pouring some boiling hot water into it. Set for 10 mintues
- Pour out the hot water
- Add in the rice grains and pour in the boiling hot water.
- Close the cap, wait for 4 hours... Voila! It's ready to eat.
See also Sweet potato porride in Tiger Food Jar, Lazy mummy's cooking method
Subscribe to:
Posts (Atom)